Check out our latest news as well as finding useful tips and resources.
Want to install an underfloor heating system? This guide by Coldbuster will cover the benefits, materials needed, floor preparation, and step-by-step installation for underfloor heating.
We will also provide tips on avoiding common mistakes and choosing the right thermostat. Start your project confidently with our clear and thorough instructions.
The allure of underfloor heating is multifaceted, particularly for tradies looking to offer clients an efficient and modern heating solution.
One of its standout features is energy efficiency. Unlike traditional radiators that work at high temperatures, underfloor heating systems operate at lower temperatures, resulting in significant energy savings.
If you are interested in expanding your services, register for a Coldbuster Trade Account that will provide you with the resources and support needed to install these systems efficiently.
Furthermore, using programmable thermostats allows you to set the heating schedule according to your daily routine, ensuring that warmth is delivered precisely when needed.
Advanced smart thermostats even enable remote control via smartphones and offer energy consumption tracking, which can further enhance cost savings and convenience.
Dual control thermostats, which manage both underfloor heating and other appliances, also add another layer of convenience, particularly in spaces like bathrooms.
Further, comfort is another significant advantage. Underfloor heating provides consistent warmth throughout a room, eliminating cold spots and ensuring a more uniform temperature distribution.
The silent operation of these systems enhances indoor air quality by reducing air movement, which often stirs up dust, a boon for those with allergies.
Additionally, underfloor heating systems are adaptable to various climates, providing stable warmth regardless of external weather conditions.
Aesthetically, radiant underfloor heating offers a cleaner look by eliminating the need for visible radiators. This not only creates a more streamlined and modern appearance but also allows for more flexible furniture arrangements.
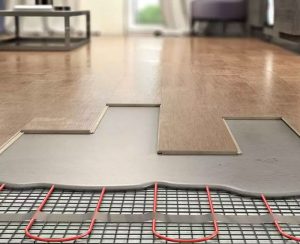
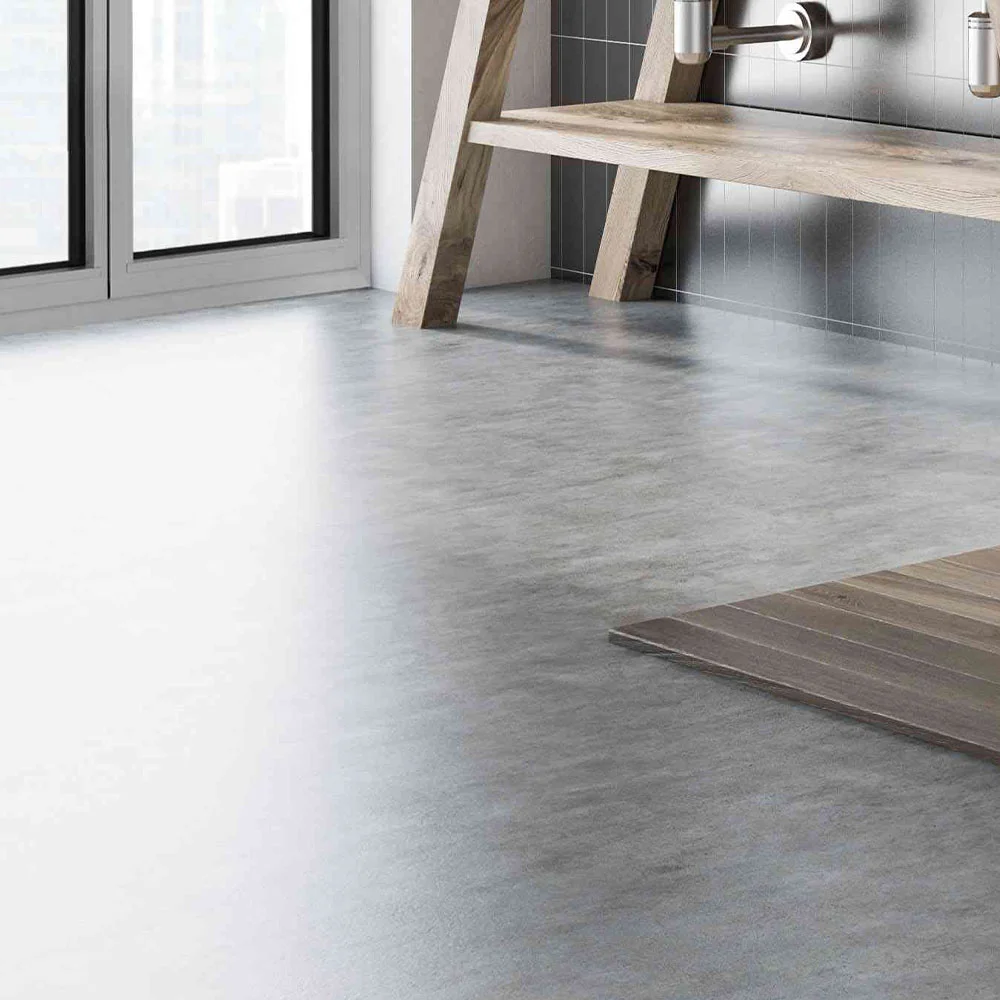
The versatility of underfloor heating extends to its compatibility with different types of floor coverings, including tiles, carpets, and wood floors, making it a suitable choice for various rooms and design preferences.

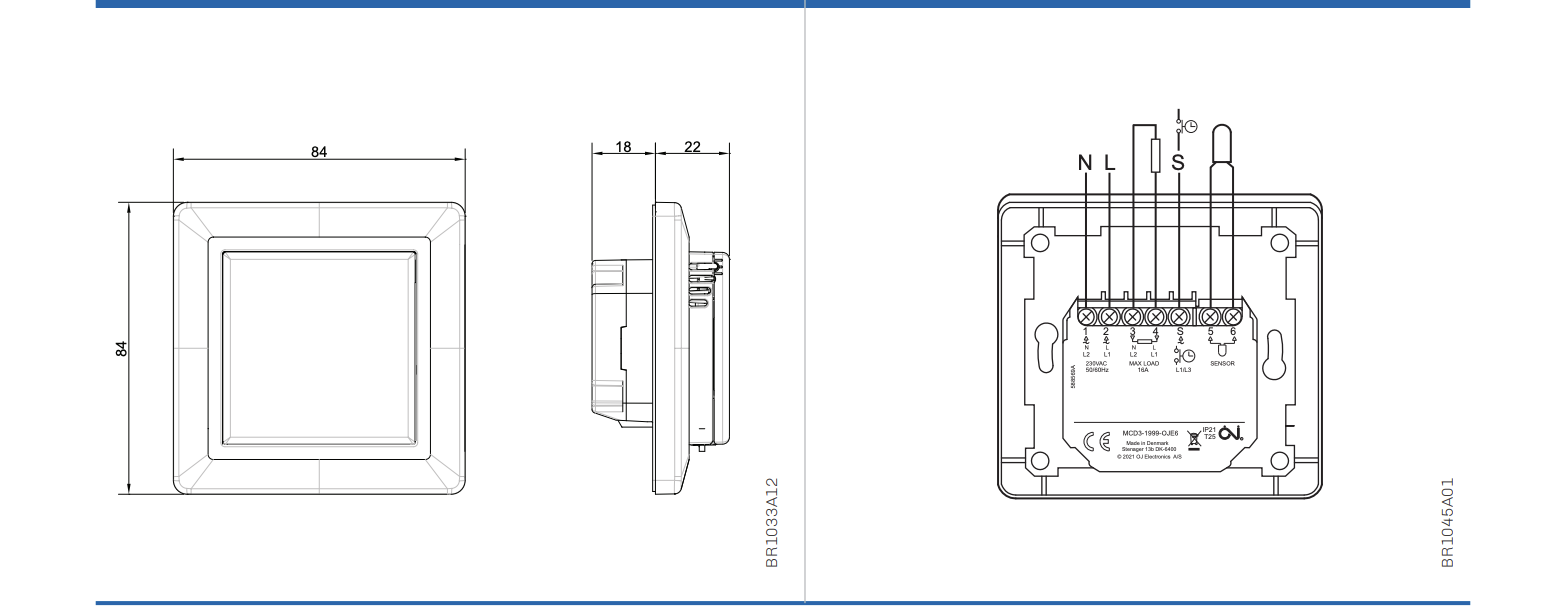
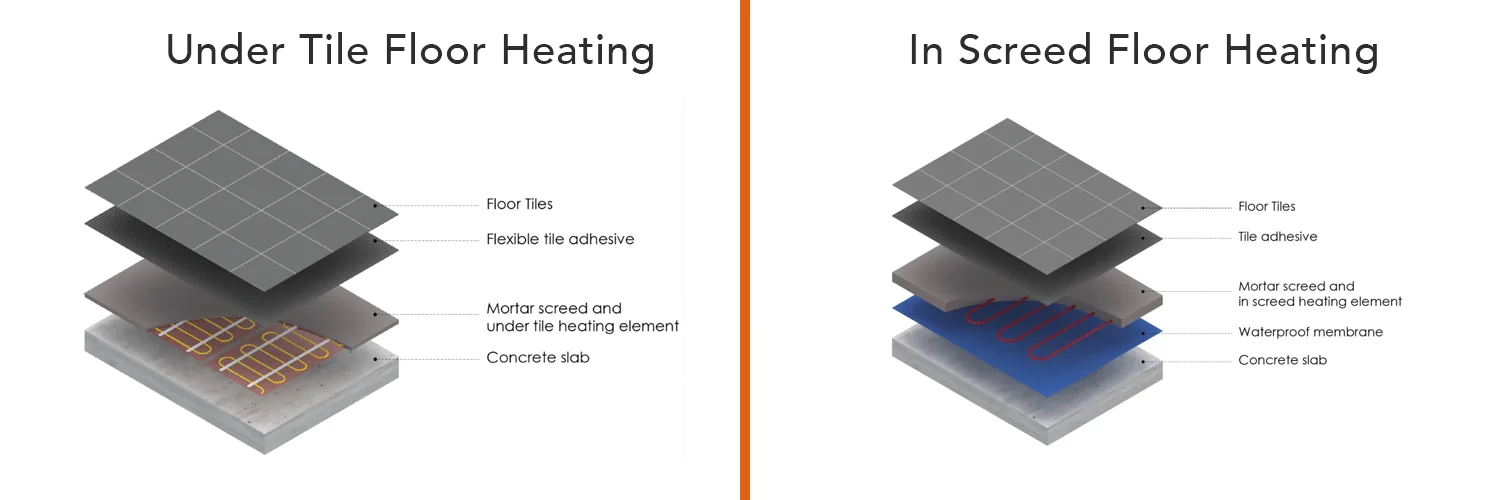
Gathering the right materials is crucial for installing an electric underfloor heating system. First things first, a quality thermostat is essential, as it controls the temperature and ensures the system operates efficiently according to your comfort needs.
To ensure the heating system works seamlessly, using flexible tile adhesive is key. It helps secure the tiles over the heating mat, ensuring proper adhesion and optimal heat conduction.
Additionally, fixing tape helps secure the heating cables during installation, while conduits protect the floor sensor cables, contributing to a smooth and reliable installation process.
Moreover, for tradies, Coldbuster provides these materials at competitive prices. As a result, you’ll have instant access to high-quality products that support professional, long-lasting installations.
Successful underfloor heating installation begins with preparation. Ensure the subfloor is level and thoroughly cleaned of any debris, dust, or old flooring.
The surface must be smooth, dry, unpainted, and free of dust, oil, grease, or glue. Meticulous preparation prevents uneven surfaces, which can affect insulation adhesion and cause future cracks.
Repair any squeaky floorboards to avoid complications. Using a self-levelling compound can create a smooth surface over the heating elements, ensuring optimal performance.
Additionally, thermal insulation boards improve efficiency and perimeter insulation foam helps prevent heat loss at the edges of the installation area.
On the other hand, in bathrooms or wet areas, ensure waterproofing is completely dry to prevent moisture-related issues. Proper preparation simplifies installation and maximises the efficiency and longevity of your underfloor heating system.
A systematic approach is needed to install electric underfloor heating and an electric underfloor heating system.
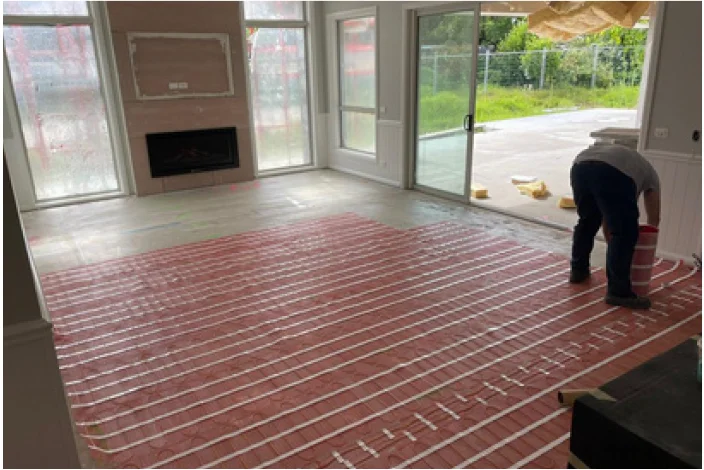
Ensure the floor surface is clean, smooth, and dry, removing any debris, dust, or old flooring. Plan the layout of the heating cables, marking out areas and avoiding placement against walls or fixtures to ensure efficient heat distribution.
After laying the heating cables or mats, maintain proper spacing and securely fasten them.
Apply a layer of flexible tile adhesive over the heating cables, ensuring good coverage for heat conduction, and allow it to cure properly before proceeding with further flooring installation.
If you’d like a more detailed approach, here are the steps to follow:
Effective planning is a critical first step. Here are some key actions to take:
Detailed planning prevents inappropriate placement of heating cables, avoiding thermal blocking and system failure.
Maintain a distance of at least 100 mm from walls and permanent fixtures to promote efficient heat distribution. Proper layout planning ensures optimal performance and prevents potential issues during installation.
After planning the layout, lay the heating cables. Proper spacing and secure placement are essential for effective heat distribution.
Space the cables at a minimum of 50mm apart to maintain even heating and avoid crossing the element wires to prevent electrical issues.
Secure the heating cables in place using fixing tape to ensure they remain stable during the application of the tile adhesive. Careful placement and spacing are vital for efficient operation.
Applying the tile adhesive correctly is the final step. Use a proper trowel and adhesive technique to ensure the heating cable is fully covered, critical for optimal heat transfer.
Apply tiles using a flexible cement-based adhesive to allow for thermal expansion and contraction. This ensures the heating system functions efficiently and the tiles remain securely in place.
Different underfloor heating systems require specific installation methods. We understand how important it is to consult with flooring manufacturers to ensure compatibility.
By creating detailed documentation for the system layout, you can avoid costly maintenance and installation errors.
For tradies, we offer special pricing on our range of heating components, ensuring you have everything you need for a smooth and successful installation. With our reliable products and support, you can confidently deliver top-quality results every time.
Now, let’s look at the different types of underfloor heating systems:
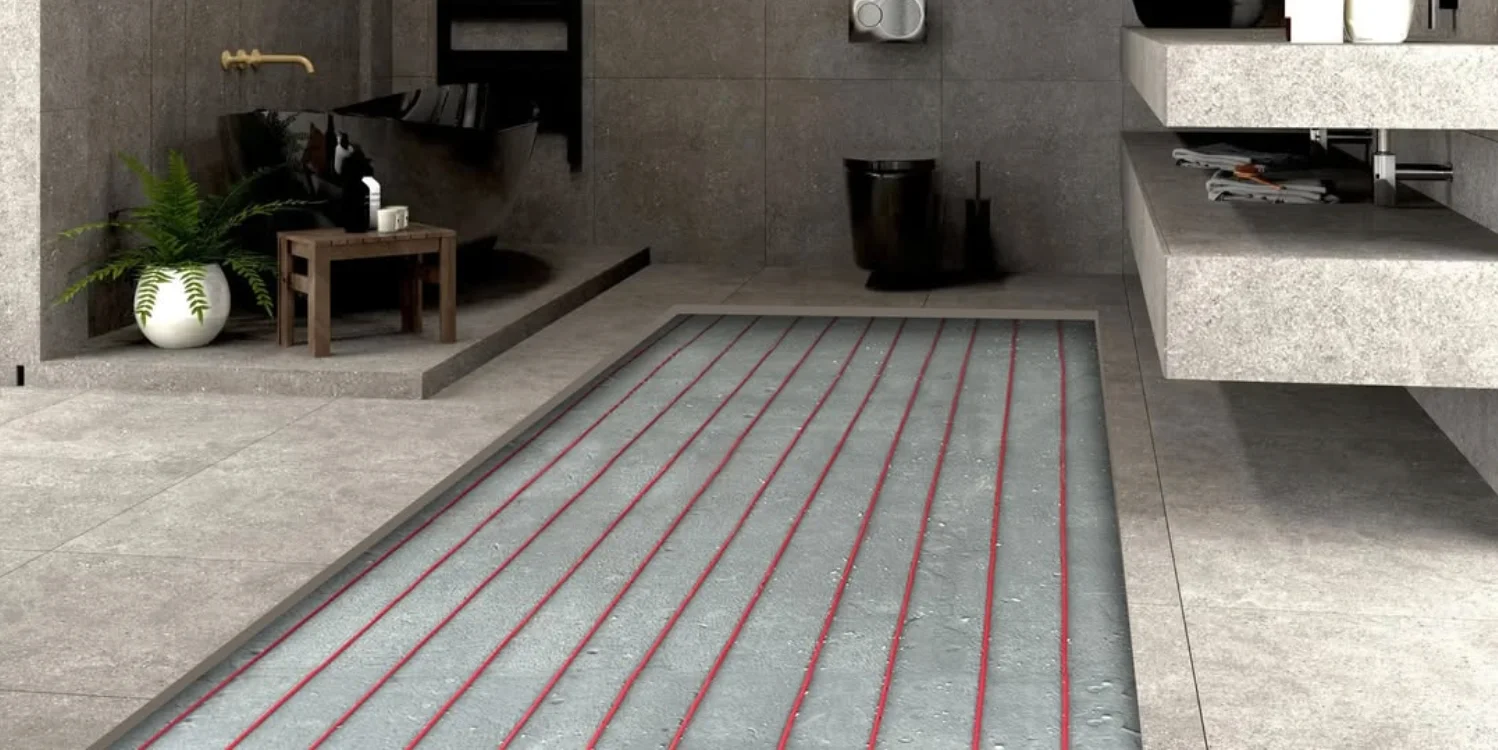
Inscreed heating, suitable for surfaces like granite, marble, and tiles, involves placing pipes on an insulation layer followed by a screed layer that encapsulates the pipes for efficient heat distribution.
Proper expansion joints accommodate thermal expansion to prevent cracks in the screed. Insulation boards should be loosely laid around the room’s perimeter to improve heating efficiency.
This heating system is compatible with various floor coverings, providing effective warmth and enhancing comfort in living spaces with hydronic heating systems, floor heating systems, and house heating.
In Slab heating systems integrate into concrete floors to ensure even warmth distribution. The electric heating component is installed within the concrete slab, creating a uniform heat output across the entire floor area.
The heating component is laid after the reinforcing mesh and before pouring the concrete.
Under Carpet heating mats involve laying the mats on the subfloor and connecting them to a thermostat, requiring minimal tools and effort.
Once installed, these mats require minimal maintenance, providing continuous comfort without frequent checks. This ensures an efficient and hassle-free heating solution that enhances comfort in any room.
Choosing the right thermostat enhances the energy efficiency of your electric underfloor heating system. These systems allow for individual temperature zoning, enabling different areas of a home to maintain specific temperature settings.
Floor sensors monitor and regulate the maximum floor temperatures to avoid overheating.
Operate underfloor heating systems continuously and adjust temperatures with thermostats to optimise efficiency rather than frequently switching the system off and on. A professional installer should connect the thermostat to ensure compliance with electrical standards, ensuring the system operates safely and efficiently.
Avoiding common mistakes is crucial for the successful operation of your underfloor heating system. One key mistake to avoid is crossing the element wires, which can lead to electrical issues.
Testing the heating system before and after tile installation verifies functionality and avoids future repairs. When placing tiles over heating cables, execute the installation carefully without cutting through the heating elements.
Supervision during screed application avoids damaging heating pipes and ensures proper curing. Selecting the wrong floor covering can significantly reduce heating efficiency and cause temperature regulation issues.
Conduct a pressure test before laying screed to detect leaks that would be hard to fix later.
Neglecting to use controllers for underfloor heating can result in higher energy costs due to inefficient heat management.
In summary, underfloor heating offers numerous benefits, including energy efficiency, consistent warmth, and aesthetic appeal.
By following the detailed installation steps, preparing your floor properly, and selecting the right materials and thermostat, you can ensure a successful installation that enhances the comfort and value of your clients’ home.
For tradies looking to get started, register for a Coldbuster Trade Account today and access exclusive pricing and support to make your next installation seamless. You can also reach out to us for more assistance!


Key Factors Affecting the Running Costs of Electric Floor Heating from Coldbuster
There are many factors and assumptions that may influence the costs of running electric floor heating.
Please note that the factors and the assumptions that underpin this Running Cost Calculator mean that results should only be used as a rough guide, as conditions (some of which are listed below) can vary greatly.
The efficiency and cost of the electricity used for heating directly impact running costs. More efficient energy sources and favourable electricity tariffs reduce overall expenses. Electricity prices vary by provider and plan. Choosing an energy-efficient tariff and monitoring peak and off-peak rates can help minimise heating costs.
The assumption in this running cost estimate model is that your energy source is cost-effective and the electricity tariff is optimised for heating needs.
The total time the heating system is operational impacts energy consumption. Running the system only when necessary and using programmable thermostats to create heating schedules can optimise usage.
The assumption in this running cost estimate model is that your heating is running only when necessary and optimised accordingly.
A duty cycle for electric underfloor heating represents the percentage of time the system is actively heating versus its total operational time. After the floor reaches its set temperature, the system cycles on and off to maintain it. The calculator factors this in and assumes a 50% duty cycle.
The temperature set on the thermostat directly affects energy usage. Lowering the thermostat temperature by just a few degrees can significantly reduce running costs without compromising comfort. Programmable and smart thermostats can optimise heating schedules, reducing energy use during non-peak times and enhancing overall efficiency. Setting the thermostat to an optimal temperature (e.g., 20-22°C) during occupied times and lowering it (or even better turning it off) when not in use can significantly affect running costs.
The assumption in this running cost estimate model is that you are using one of Coldbuster’s smart programmable thermostats to manage heating schedules effectively and that the settings are optimised for both comfort and efficiency.
Proper insulation reduces heat loss, making the heating system more efficient. Effective insulation in your floors, walls and roofs will help maintain the desired temperature with less energy consumption. Better insulation helps retain heat within the room, minimising the energy required to maintain comfort.
The assumption in this running cost estimate model is that your building has high-quality insulation materials installed in the walls, roof, and floor.
The type of floor substrate affects heat retention and energy efficiency. Concrete floors, for example, retain heat longer, while timber floors may require more energy to maintain warmth.
The assumption is that your floor substrate is conducive to efficient heating, with thermal insulation boards used where necessary to enhance heat retention.
Different floor coverings have varying thermal properties. Materials like tile and stone conduct heat efficiently, while carpets and wood may require higher energy to achieve the same comfort level.
The assumption in this running cost estimate model is that your flooring material is chosen with consideration of its thermal conductivity and compatibility with the heating system.
Draughts from poorly sealed windows and doors, as well as other gaps, can lead to heat loss and increased energy consumption. The type and quality of windows and doors significantly impact heat loss and gain. Double-glazing and well-sealed frames reduce draughts and improve thermal efficiency.
The assumption in this running cost estimate model is that your windows, doors, and other potential gaps are well-sealed to prevent drafts and heat loss.
The overall energy efficiency of a building, including factors like construction quality, age, design and energy ratings, all affect its thermal efficiency and hence impacts heating costs. Older buildings may have more heat loss compared to newer, energy-efficient constructions.
The assumption in this running cost estimate model is that your building is relatively modern or has been updated to meet contemporary energy efficiency standards.
The local climate influences heating needs. Colder outdoor temperatures increase the demand for indoor heating. Regions with milder winters require less heating and would therefore typically have lower running costs compared to areas with harsh winter and cold conditions.
The assumption in this running cost estimate model is based on average climatic conditions specific to the region in Australia where you are located and where the system is installed.
The efficiency of the underfloor heating system itself plays a crucial role. The efficiency determines how effectively it converts electrical energy into heat. Modern systems with advanced controls and high efficiency like Coldbuster use less energy to achieve the desired warmth.
The assumption in this running cost estimate model is that your heating system is running efficiently at all times.
The ability to control heating in different zones or rooms independently allows for more precise energy use, heating only the areas that need it.
The assumption in this running cost estimate model is that your heating system is designed with zoning capabilities for customised temperature control.
The design of the heating system, including the layout, spacing, and type of heating elements, affects heat distribution and overall efficiency. The size of the room in relation to the heater’s capacity is crucial. An appropriately sized heater ensures efficient heating without overworking the system.
The assumption in this running cost estimate model is that your heating system is designed and installed by experienced Coldbuster installation professionals or other suitably qualified professionals to ensure optimal performance and energy efficiency.
Consistent and predictable usage patterns help in planning and optimising energy consumption. Irregular or excessive use can lead to higher costs.
The assumption in this running cost estimate model is that your usage patterns are regular and not excessive.
Higher ceilings result in larger volumes of air to heat, which can increase energy consumption. Rooms with standard ceiling heights are more energy efficient.
The assumption in this running cost estimate model is that your ceiling heights are standard (2.4 to 2.7 meters) to maintain optimal energy efficiency and minimize excess energy use.